Thông tin tài liệu:
Flight plan: Every flight should have a purpose– PIC24 16-bit microcontroller PIC24FJ128GA010– MPLAB® IDE– MPLAB C30. The flight– Our first line of code is going to be:#include This is not yet a proper C statement, but more of a pseudoinstructionfor the preprocessor telling the compiler toread the content of a device-specific file beforeproceeding any further. The content of the device-specific “.h” file chosen is nothing more than a long list of thenames (and sizes) of all the internal special-functionregisters (SFRs) of the chosen PIC24 model....
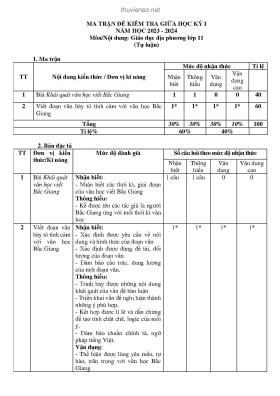
Nội dung trích xuất từ tài liệu:
Hệ thống nhúng - Chương 1Embedded Systems Hệ thống nhúng Thạc sĩ Lê Mạnh Hải 1 Môû ñaàuI Mục đích môn học:• Cung cấp kiến thức về lập trình nhúng trên Microchip PIC24• Rèn luyện kỹ năng đọc sách chuyên ngành bằng tiếng AnhII. Thời gian:• 30 tiết lý thuyết (3 ĐVHT) + 30 tiết thực hànhIII Giáo trình và tài liệu tham khảo• Programming 16-Bit PIC Microcontrollers in C: Learning to Fly the PIC24. Lucio Di Jasio. Elsevier. 2007• Designing Embedded Systems with PIC Microcontrollers. Principles and applications.Tim Wilmshurst. Elsevier. 2007IV. Đánh giá:• Thi kết thúc môn:70%. Có một bài báo cáo kỹ thuật.• V. Giáo viên:• Thạc sĩ Lê Mạnh Hải. Tel: 0985399000. Không gọi điện thoại để hỏi hay xin điểm, email: hailemanh@yahoo.com 2 Lesson 1:THE FIRST FLIGHT• Flight plan: Every flight should have a purpose – PIC24 16-bit microcontroller PIC24FJ128GA010 – MPLAB® IDE – MPLAB C30• The flight – Our first line of code is going to be: #include This is not yet a proper C statement, but more of a pseudo- instruction for the preprocessor telling the compiler to read the content of a device-specific file before proceeding any further. The content of the device-specifi c “.h” file chosen is nothing more than a long list of the names (and sizes) of all the internal special-function registers (SFRs) of the chosen PIC24 model. 3 CprogrammingGoing back to our “Hello.c” source fi le, let’s add a couple more lines that will introduce you to the main() function:1. main()2. {3. }We said our mission was to turn on one or more I/O pins: say PORTA, pins RA0–7. In assembly, we would have used a pair of mov instructions to transfer a literal value to the output port. In C it is much easier—we can write an “assignment statement” as in the following example:1. #include 2. main()3. {4. PORTA = 0xff;5. }Is it correct? 4 Compiling and linking• This operation is called a Project Build. The sequence of events is fairly long and complex, but it is composed mainly of two steps:• Compiling: The C compiler is invoked and an object code file (.o) is generated. This file is not yet a complete executable. While most of the code generation is complete, all the addresses of functions and variables are still undefi ned. In fact, this is also called a relocatable code object. If there are multiple source files, this step is repeated for each one of them.• Linking: The linker is invoked and a proper position in the memory space is found for each function and each variable. Also any number of precompiler object code fi les and standard library functions may be added at this time as required. Among the several output files produced by the linker is the actual binary executable file (.hex).• All this is performed in a very rapid sequence as soon as you select the option “Build All” from the Project menu. 5DataSheet 6789 PORT initialization1. main()2. {3. TRISA = 0; // all PORTA pins output4. PORTA = 0xff;5. }Question 1: How many bit does PORTA have? Question 2: How to set all pins of PORTA? 10 Testing PORTB• Most of PORTB pins are multiplexed with the analog inputs of the analog-to-digital converter (ADC) peripheral. The 8-bit architecture reserved PORTA pins primarily for this purpose—the roles of the two ports have been swapped!1. #include 2. main()3. {TRISB = 0; // all PORTB pins output4. AD1PCFG = 0xffff; // all PORTB pins digital5. PORTB = 0xff;} 11 Exercises• If you have the Explorer16 board:• Use the ICD2 Debugging Checklist to help you prepare the project for debugging.• To test the PORTA example, connect the Explorer16 board and check the visual output on LED0–7.• To test the PORTB example, connect a voltmeter (or DMM) to pin RB0 and watch the needle move as you single-step through the code. 12Development Tools 13 Quiz• How many ports does PIC24FJ126GA010 have?• What are differences between PORTA and PORTB• How to set PORTB to be DIGITAL INPUT? 14 What is next?• CHAPTER 2: A LOOP IN THE PATTERN – An animated simulation – Using the Logic Analyzer 15


 Danh mục tài liệu